

What Are Pre-Writing Strokes? A Parent's Guide to Handwriting Readiness
Long before your child writes their first letter, their hand is already learning to write.
Every confident, legible letter a child eventually forms is built on a foundation laid months earlier — through lines, curves, and loops that have nothing to do with the alphabet at all. Occupational therapists call these pre-writing strokes, and they're one of the best-kept secrets to raising a child who picks up a pencil with confidence instead of frustration.
Here's what pre-writing strokes are, why the order they're learned in matters, and how the GiggleNest's own Stroke Basics Pre-Writing Stencil Set was designed around exactly this progression.
What Are Pre-Writing Strokes?
Pediatric occupational therapists describe pre-writing strokes as the basic lines and shapes a child needs to master before letter formation is even possible. The core set generally includes:
- Horizontal lines
- Vertical lines
- Circles
- Crosses
- Diagonal lines
- "X" shapes
- Squares
- Triangles
These aren't random doodles — every letter and number a child will ever write is really just a combination of a few of these basic strokes. An "L" is a vertical and a horizontal line. An "O" is a circle. A "K" is a vertical line plus two diagonals. Master the strokes, and letters stop feeling like a mystery.
Why These Strokes Matter So Much
It's tempting to hand a preschooler a workbook and jump straight to letters. But therapists who work on handwriting readiness every day point to a few specific reasons pre-writing practice comes first:
✏️ Builds the Right Grip
Repeated tracing naturally encourages the tripod grasp children need for comfortable, controlled writing later on.
💪 Strengthens Small Hand Muscles
Tracing strokes again and again builds the finger and hand strength needed to hold a pencil steady for longer stretches.
👁️ Trains the Eyes and Hand Together
Following a groove or guide connects what a child sees to what their hand does — the basis of all visual-motor coordination.
➡️ Teaches Writing Direction
Practicing strokes top-to-bottom and left-to-right builds the orientation habits that make actual handwriting possible.
The Order Matters: Simple Strokes Before Complex Shapes
One detail parents often miss: pre-writing strokes aren't practiced in random order. Occupational therapy resources consistently point to a natural progression — straight lines first, since they require the least amount of hand control, followed by curves and circles, and only then the more complex combinations like crosses, diagonals, X's, squares, and triangles that demand more precision and motor planning.
Skip ahead too fast, and a child ends up frustrated by a shape their hand simply isn't ready for yet. Follow the progression, and each new stroke feels like a natural next step rather than a struggle.
How the GiggleNest Stroke Basics Set Was Built Around This
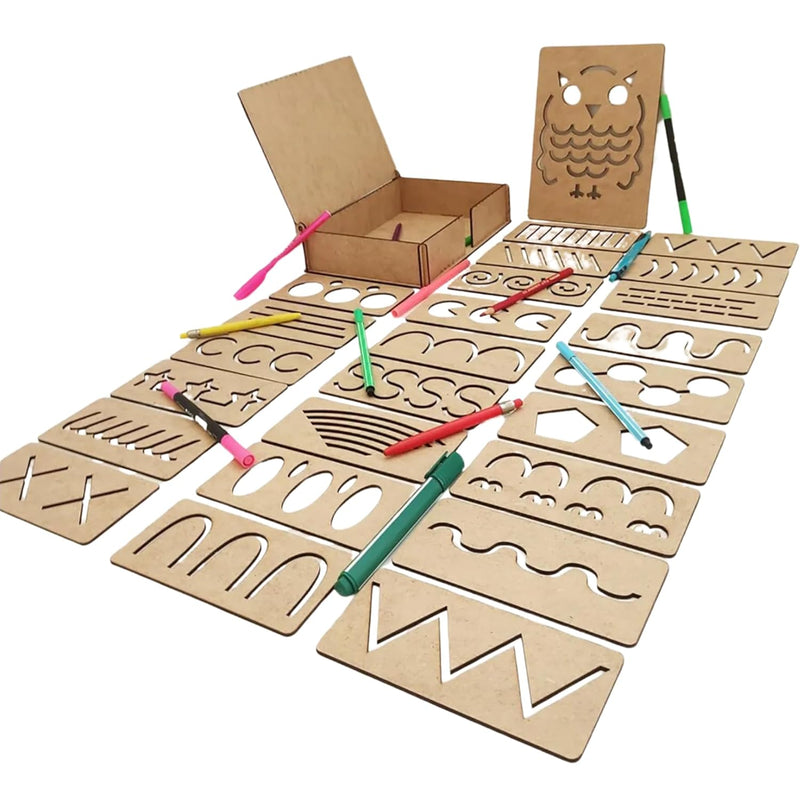
Stroke Basics Pre-Writing Stencil Set (25 pieces + storage box)
Ages 3–6 ·
We built this set the same way occupational therapists sequence pre-writing practice: starting with the simplest straight-line boards and gradually working up to curves, loops, zigzags, and finally fun combination shapes like a house and an owl.
Each of the 25 wooden boards guides a child's pencil through a groove, so the stroke is felt as much as it's seen — reinforcing the same muscle memory and hand-eye coordination that occupational therapy pre-writing activities are designed to build.
Shop the Stroke Basics Set →What's inside the box: 1 large owl stencil board + 24 mini stencil boards, moving from simple lines and curves to loops, zigzags, and shapes. Every board is reusable — trace, lift, and start again, so the set keeps earning its place on the shelf well past the first few weeks.
A Simple 10-Minute Pre-Writing Routine at Home
- Start with a straight-line board. Let your child trace a few horizontal and vertical lines first — this warms up their grip and confidence.
- Move to curves and circles. These require a bit more control, so introduce them once straight lines feel easy.
- Finish with a shape board. Combination shapes like the house or owl bring several strokes together — a satisfying way to end the session.
- Keep it short and frequent. Ten minutes a day beats one long session a week — little hands build strength through repetition, not duration.
FAQs
Q: At what age should a child start practicing pre-writing strokes?
A: Most children are ready to begin around age 3, starting with simple straight lines before progressing to curves and combined shapes through age 6.
Q: My child can already write some letters — is this set still useful?
A: Yes. Even children who've started writing benefit from revisiting basic strokes to smooth out grip, pressure, and control — it's the same principle occupational therapists use for handwriting remediation, not just early learners.
Q: How is a wooden stencil board different from a printable worksheet?
A: The groove gives a child's hand physical feedback, not just a visual guide — and unlike a worksheet, it's reusable indefinitely, so the practice can continue for months.
Give Your Child's Hand a Head Start
The Stroke Basics Pre-Writing Stencil Set takes children from their very first line to confident, controlled shapes — one wooden board at a time.
Shop Now →