

How to Teach CVC Words: From SATPIN to Independent Spelling
See it, Draw it, Say & build it, write it: reading grows from sounds your child can see and say.
There is a magic moment in every young reader's journey. Your child looks at three letters, says each sound, and then blends them into a word: c-a-t, cat! Those three-letter words are called CVC words (consonant, vowel, consonant), and they are usually the first words children can read and spell on their own.
Here is what CVC words are, how a word-building routine helps children move from sounds to spelling, and how GiggleNest's CVC Word Blending & Sound Board puts it all on one double-sided board.
What Are CVC Words?
A CVC word has a consonant, then a short vowel sound, then another consonant. Every sound can be heard clearly, which makes these words the best starting point for blending.
| Short vowel | Example CVC words |
|---|---|
| a | cat, map, pan, sat |
| e | pen, net, bed, hen |
| i | pin, sit, tip, lid |
| o | dog, pot, top, mop |
| u | sun, cup, bus, nut |
Children usually start with the letter sounds S, A, T, P, I, and N. With just those six, they can already build words like sat, pin, tap, nap, and sit. That is why many phonics programmes begin with these "SATPIN" letters.
Why a Word-Building Routine Works
Reading and spelling are two sides of the same skill. A child who can split a word into its sounds can also spell it, and a child who can spell it can read it. Word-building mats turn this into a short, repeatable routine with a clear order:
- Look at the picture. A picture of a cat, a cup, or a bus gives the child a word to think about.
- Say the sounds. The child breaks the word into its sounds, one at a time.
- Draw it. Sketching the object links the spelling to a picture and gives little hands some fine motor practice.
- Build the word. Using letters, the child puts the sounds in order.
- Write it. The child writes the whole word on their own.
This routine works best for children who already know most of their letter sounds and are ready to start blending. Every round uses hearing, seeing, saying, and writing together, so the learning sticks.
Meet the GiggleNest CVC Word Blending & Sound Board
CVC Word Blending & Sound Board (Dry-Erase)
Double-sided · Reusable dry-erase · 1 marker included
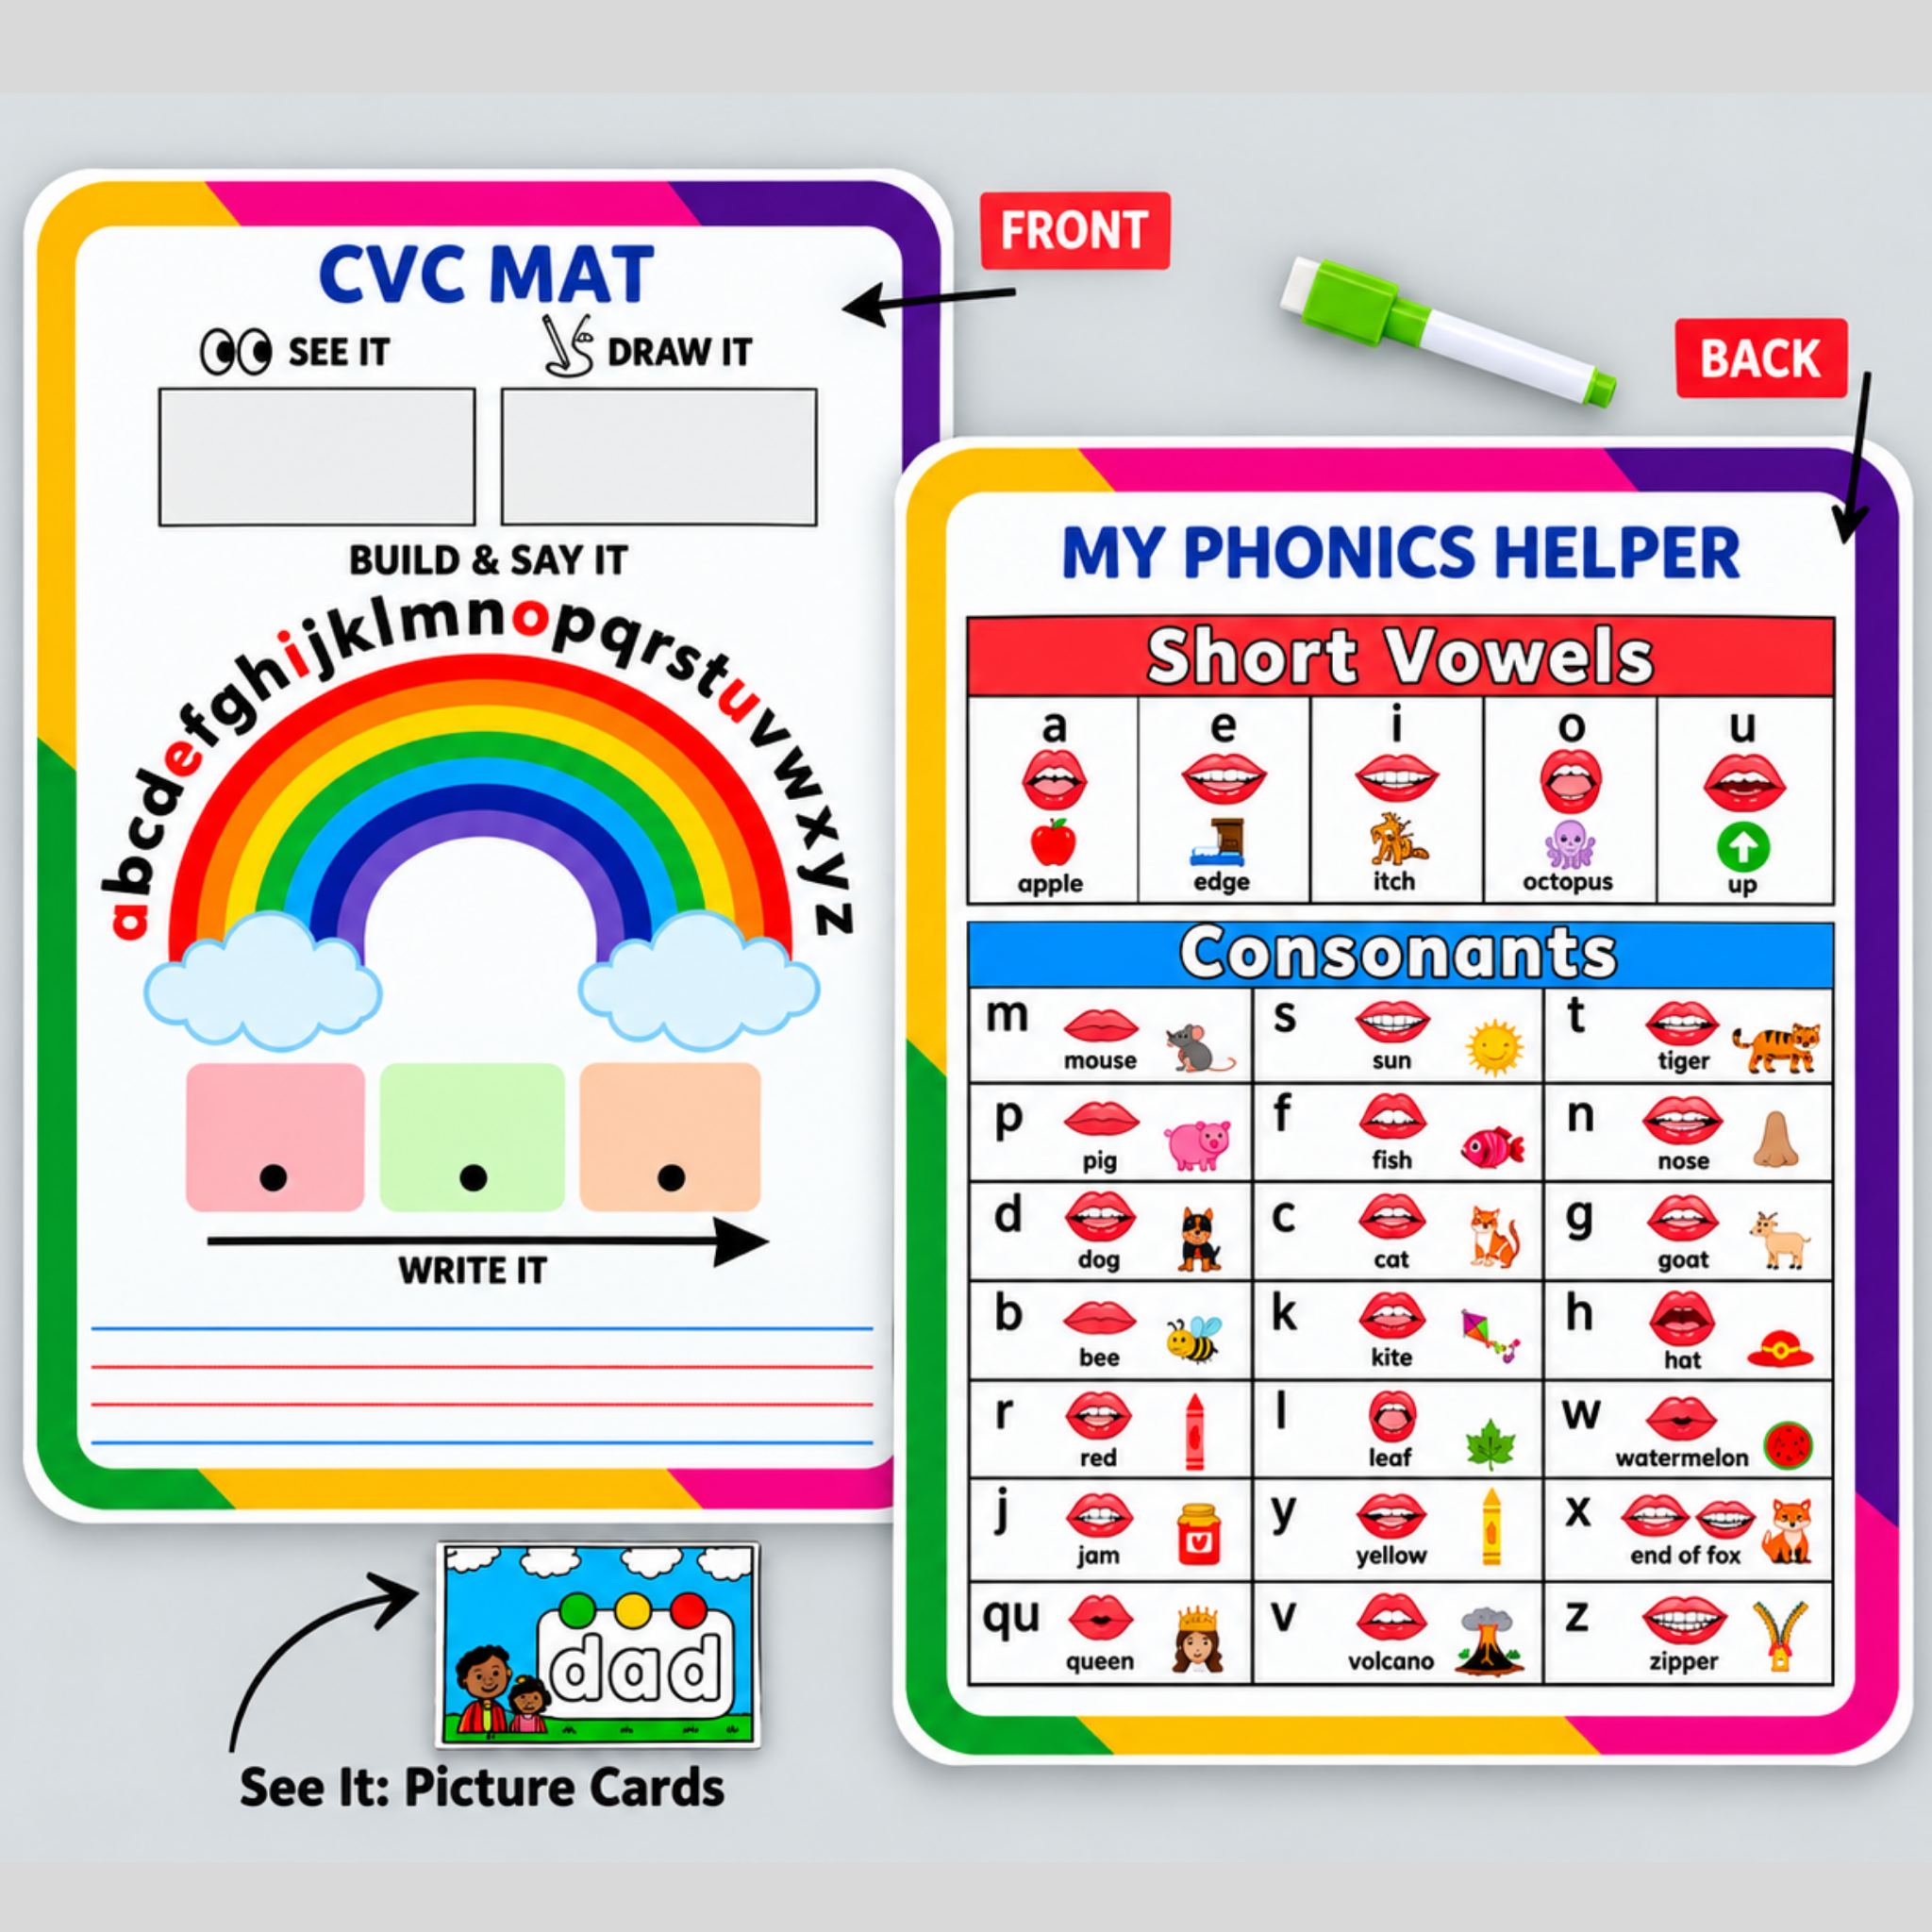
A double-sided phonics board that pairs CVC reading practice with a full mouth-shape sound guide. Flip it to switch from building words to checking how each sound is made.
- 🔄 Double-sided, dry-erase and reusable
- 🔤 CVC and SATPIN words
- 👄 Mouth-shape sound guide
- 🖼️ 20 picture cards
What is on each side?
Side 1: CVC Mat
A See It & Draw It section for the picture, a rainbow alphabet arc for Build & Say It, and ruled Write It lines for spelling the finished word.
Side 2: My Phonics Helper
A Short Vowels chart and a Consonants chart. Each pairs a letter, a mouth-shape image, and a picture-word cue, so your child can check how a sound is made.
What it helps build
👄 Mouth formation & sound clarity
Seeing how each sound is shaped helps children say it more clearly.
👂 Sound recognition
Listening for each sound in a word is the first step toward blending.
✏️ Spelling & writing
Building, then writing, the word links sounds to letters.
📖 Vocabulary
Twenty picture cards connect new words to things children know.
How to play
Side 1, the mouth-shape guide (My Phonics Helper)
- Check the mouth shape. Look at the picture for the letter. Where are the lips, tongue, and teeth?
- Say the sound. Copy the shape and say the sound out loud. A small mirror makes this extra fun.
Side 2, the word-building mat (CVC Mat)
- Place the picture card. Pick one of the 20 cards, say its name, and put it in the picture box.
- Draw it. Sketch the object with the dry-erase marker.
- Build and write the word. Sound out each letter using the rainbow alphabet arc, then write the whole word on the lines.
- Wipe and repeat. Clean the board and try a new card.
Tip: before building, tap or clap once for each sound in the word, such as three taps for c-a-t. It helps children hear the sounds one by one before they spell.
A Step-by-Step Path: From SATPIN to Independent Spelling
Children learn best when each step is small and ends with a win. Here is a suggested path for using the board. Spend as long as you need on each level, and move on only when your child feels confident. There is no rush.
Level 1: Meet the sounds (S, A, T, I, P, N)
Start with the mouth-shape guide. Look at each letter, copy the mouth shape, and say the sound. Learn two or three letters at a time, not all six at once.
Goal: your child can say the sound for each of the six letters.
Level 2: Build your first words with SATPIN
Use only the SATPIN letters to make words like sat, pin, tap, nap, sit, and pit. Pick a picture card, say the sounds, build the word on the rainbow arc, then write it.
Goal: your child can blend three sounds into a word.
Level 3: One vowel at a time
Move beyond SATPIN, but keep the vowel the same for a whole session. Start with short a (cat, map, bag), then short i (lid, big, zip), then short o (dog, pot, mop).
Goal: your child hears and writes the same vowel sound in several words.
Level 4: Add the trickier vowels
Now bring in short e (pen, bed, net) and short u (sun, cup, bus). These two sounds are easy to mix up, so check the Short Vowels chart and its mouth-shape pictures together.
Goal: your child can tell the five short vowels apart.
Level 5: Mix all the vowels
Shuffle the picture cards so the vowels come up in any order. Your child has to listen carefully to choose the right vowel each time.
Goal: your child builds and writes CVC words with all five vowels.
Level 6: Spell on your own
Turn a card face down, say the word aloud, then build and write it without looking at the letters first. Draw the picture last, as a reward. You can also say a word yourself and let your child choose the matching card.
Goal: your child spells CVC words independently.
Parent tip: keep each session to about 10 minutes, and finish with a word your child gets right. If a level feels hard, go back one step and stay there a little longer. Revisiting an easier level is part of learning, not a setback.
Who Is It For?
- Parents at home: an easy way to practise phonics and sound recognition on their own, a few words at a time.
- Kindergarten and Grade 1 classrooms: works well for literacy centres, stations, and small-group work.
- Homeschool programmes: a repeatable activity for phonics revision.
FAQs
Q: What age is the CVC Word Blending & Sound Board for?
A: It suits children in Kindergarten and Grade 1 who know most of their letter sounds and are ready to start blending.
Q: Does my child need to know all the letters first?
A: No. The board includes SATPIN words, so children can begin with just a handful of letter sounds, then add more as they learn.
Q: Is the board reusable?
A: Yes. Both sides are dry-erase, so you can wipe and reuse them as often as you like. A marker is included.
Q: What is the mouth-shape guide for?
A: It shows how the lips, tongue, and teeth form each sound, which helps children say sounds clearly and tell similar ones apart.
Q: Can it replace a reading programme?
A: It is a practice tool for phonics revision and works best alongside reading together every day. If you have concerns about your child's speech or reading, please speak with a teacher or specialist.
Turn Sounds into Words, One Flip at a Time
The CVC Word Blending & Sound Board gives your child everything to see it, say it, build it, and write it, all on one reusable board.
Shop Now →